wonderfully made: DIY
Showing posts with label DIY. Show all posts

Monday, May 18, 2015

Super sneak peek | baby B's nursery

Deep breath.

Ok, so here's the thing. I like surprises and I hate showing 'my work' or any sort of progress pictures. I like to show the big picture for the WOW factor. I did it with our kitchen remodel, I meant to do it with our floor remodel, and I intended to do it with the nursery. However, I think sometimes that can get overwhelming and carry a lot of pressure for me so I'm changing it up this time. Plus, I'm just so obsessed with this addition to the nursery that I had to share it as soon as I was finished!

Here's the back story: I was wanting a cute little mobile above the crib for Baby B's room but was conflicted about what to do since we have kind of a 'feature ceiling' and I didn't really want something else hanging from the ceiling. I was scouring Pinterest for ideas and ended up putting a few of those ideas together to make this cute little guy:


I had ordered this moose for Mark when I decorated his apartment after college. I kept asking him if we could put it in the nursery but since it was the junior size, it was too small for this project. We were inspired by the 'large' size but Mark ended up using his resources, making his own template, and making this for me for about $45 less than what the large size retails for. Score!


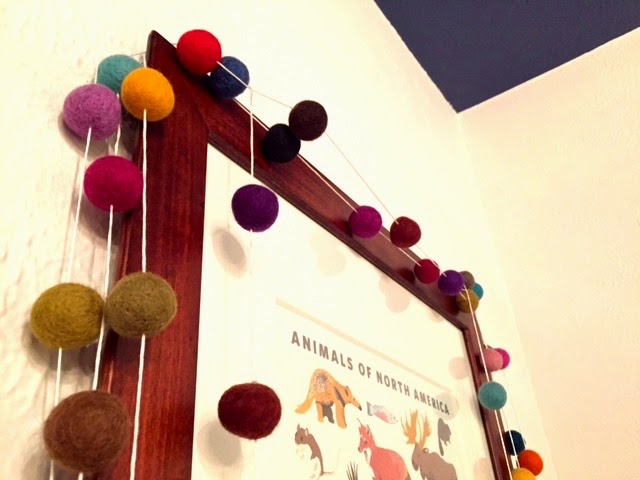
Next, I ordered my felt balls and assembled my garland. Then, we strung it over the moose randomly. 

woodland nursery

I'm OBSESSED. I feel like 'my moose' (as I've lovingly referred to it for the last few weeks) finishes the room perfectly and will be so fun for our baby to look up at in the future. It anchors the crib and makes the room feel so whimsical!


I mean, talk about a MAJOR sneak peek! You lucky ducks! See what I mean about a feature ceiling??

retro woodland nursery


We're still missing the bedding (although I've definitely considered just having a full white set of bedding when I want a clean look), the changing pad cover, rockers for the chair, and all the little baby accessories.

woodland nursery

I can't wait to show you the rest of the room! Until then, I'll sit in there every night dreaming and waiting for my baby boy (and thanking my lucky stars for such a talented husband that goes along with my crazy requests!)

Wednesday, April 29, 2015

a DIY project for baby B's nursery

I tend to have creative spurts here and there and the impending arrival of baby boy has me in overdrive! 

I mentioned in my nursery post that I really wanted to do some sort of felt balls or bunting in baby B's room. I was brainstorming some other decorative ideas a few days ago and suddenly came up with a GENIUS idea that just happens to involve those felt balls I was talking about. Right now, I'm waiting for MY other half to finish up THE other half of this great idea of mine, but I made my felt garland and thought I'd share it with you!

(I'll have to do my 22 week bumpdate tomorrow so be sure to check back for that!)


I checked the websites of all the major craft stores (Joann, Hobby Lobby, etc.) and checked out Amazon but I ended up finding these felt balls through a fellow Etsy store. I liked the colors, size, and the price so I ordered one 50 count package. 


how to make felt ball garland

All of the colors are different and they are so pretty! First, I separated them out by color just to see what I was pulling from.

Then, I pulled out some embroidery thread (bright white) and a regular needle. I had purchased a felt needle from the same Etsy shop but it did NOT work how I wanted it to, so I quickly switched to a standard needle I already had on hand.


It was simple! Just poke a hole straight through your felt ball and start gathering them together. Don't worry about spacing at this point.


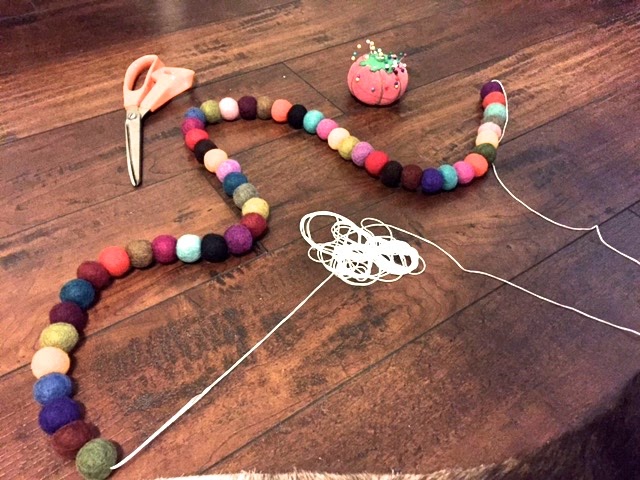
I tried to vary my color pattern so no two colors were very close together. I didn't want it to seem like the garland fell into any sort of 'theme'. Once I had all of the felt balls on there, it looked like this:

how to make felt ball garland

I took the thread out of the needle and made a thick knot at that loose end.


From there, I measured about a hand width and started my spacing. 


I would push the bulk of the felt balls down the thread so I could work my way down. As they got in the way, I pushed them down further. 

I continued spacing the balls down the thread by comparing the space between 3 of the balls, see below.


When I was done, I had about 10' of garland!


how to  make felt ball garland

I wrapped it around my neck to keep it untangled and place it in the nursery. What do you think, new necklace trend?


Here it is in it's temporary spot...as well as a sneak peek at the nursery! I LOVEEEEE love love it already and can't wait to show you guys the final product.

how to make felt ball garland nursery

My felt garland brings me so much joy and it was SO easy! Make one for yourself!

Wednesday, August 13, 2014

Coffee talk

I find it odd that we've been doing this DIY thing for over a year now, frequent Home Depot and Lowe's 2 or more times per week,  yet I posted this instagram photo on Monday night and I had more than one person ask me why we were at Home Depot. Umm...you should know I'm constantly doing things by now! ;)

Anyway, we made an impromptu run to Home Depot for this (among other boring things, like air filters):


Yep, I finally put up my shelf for my coffee bar! To be honest, there was a little switching around shelves and I'll post an update of my bathroom soon, which was on the other end of the switcheroo. Regardless, we have shelving! And I love it!


I think Mark likes it too...

Just for fun, I decided to do a little styling session so you could see different ways I might style it and give me some feedback too! When I style things, I typically walk around my house and pick up things that will fit in the space. This time was no different! I just futz with it until I'm pleased with how it looks.

So here we go:

Option 1 - eclectic mix

This was a little funky and also too busy.

Option 2 - simple and natural


Super simple and nice, but didn't add enough height!

Option 3 - height and variety


The mirror here was TOO tall, almost hitting the ceiling. Plus, it's permanent home is just a few feet away on the wall perpendicular to this coffee bar.

Option 4 - modern farmhouse


I LOVE this option and will probably end up doing this most of the time. 

For now, I ended up going with a mixture of options 1 and 4. I'm going to call it "farmhouse chic" just for the sake of calling it something. I like the black and white picture of Mark and me, the hydrangea (duh) and the coffee sign that Mark bought me on our anniversary because he knew I wanted to do a coffee bar (who knew it would take me almost a year to get it done). I added some plain bowls to match the coffee mugs for a more rustic open-shelving look. 


So what do you think? Who's coming over for coffee? :)

Tuesday, May 27, 2014

Sucker for succulents

I hope everyone had a wonderful three-day weekend honoring and remembering those who have served our country! 


I had a well-balanced weekend and I feel refreshed to start this four-day week!

Today, since I've given you lots of updates on our outdoor plants, I thought I should share some updates on indoor plants. Spring and summer make me want to embrace living plants and the green and color that accompany the seasons, so I've gotten plant-happy both inside and outside my home. 


Mark's sister and her family gave us two little succulents planted in mason jars for housewarming gifts back in July. Unfortunately the smaller one succumbed to my black thumb but this one has been THRIVING! It has almost outgrown the jar but it's a constant reminder of my ability to keep it alive. I love the little "home sweet home" flag Andrea added and it's currently sitting on our coffee bar next to this cute Van Gogh quote print. 


Recently, I saw an image on Pinterest using more mason jars and teacups for succulents and I had a light bulb moment. I have a ton of mason jars (don't all bloggers?) and figured I could spare a few to feed my succulent habit.


I picked up these little guys at home depot for about $3 each and they live on my kitchen window sill. They make me happy every day!


Pink cacti are the best cacti.


They add even more happiness to my backyard view.

I chose to plant another little guy (my mom called it hen and chicks or something like that?) in this teacup that my aunt gave me when I was little. The china pattern is "Diana" and I've held onto it forever. It's super dainty and sweet but I felt so bad for not using it since I don't drink tea or coffee.


I found the perfect solution!


This little lady brings lots of life and joy to the shelf in our living room.


Do you have any living plants around your house? I'm convinced they have secret powers and just make the house feel better. 

Have a great week!

Monday, March 24, 2014

A finished bedroom

When we first moved in, I wasn't super focused on our bedroom. I had dreams of it looking good, of course, but there just wasn't a lot of thought put into it. Fast forward 9-ish months and I think it's the most complete room in the house. 

We put up curtains about a month ago and I've also moved some "art" around. Lately I've been searching for a large piece to go above the dresser and bring some height to that side of the room. I was inspired by these two pins:

I ended up doing a combination of both and this is what I came up with:


The project was really easy and basically fool-proof. I just picked up a $12 piece of plywood at Home Depot that looked roughly the right size. Then I stained it using leftover counter top stain from our kitchen remodel and painted my words on!

I love the verse and I think it's perfect for our room. 


I'd say our room is basically complete, unless we decide to replace the flooring down the road.


I can't say the same about the bathroom...disaster! Update on that coming soon! ;)


We were busy this weekend so I have a lot more DIY posts coming down the pipeline. Be sure to check back!

Have a great Monday!