wonderfully made: door knobs
Showing posts with label door knobs. Show all posts

Monday, August 5, 2013

The transformation begins...

This was our weekend. 

Mark, Heather, Kelly, Jevon, Taylor, Michael, Amy, and I spent a good part of our weekend painting. Thankfully there are no photos of me from the weekend, because I'm pretty sure that would break the internet.

I just want to say first off that we are SO grateful that our friends were able to pitch in. With their help we were able to paint 95% of our house in just one weekend. If Mark and I had painted alone, it would probably stretch into at least 3 weekends. So, THANK YOU friends!!!!!

As I mentioned, we painted about 95% of the house. That means we painted the living room, kitchen, hallway, guest bath, office, guest room, and master bedroom. We also painted all of the trim, 50% of the front door, and finished all of the hardware. Mark put up new house numbers, worked on the soaker hoses, and replaced 50% of the trim that needed fixing. Mark and I were at the house for about 24 hours between Saturday and Sunday and we think it shows!

Here are some photos of our progress:

-Living room-
before

after

before

after


-Kitchen-
before

after


-Guest Bath-
before

after


before

after


-Hallway-
before
(sorry for the dark photos)

after 


-Guest room-
before

after
(this is a light mint color that changes from very minty to white with a slightly mint tone. I hope that when I get my furniture in it will be the perfect color! We painted this room twice and I'm glad I didn't take pictures of the first color! It was mint on neon steroids!)


-Office-
before

after


-Master bedroom- 
before

after
(this is a dark grey that reads blue sometimes, but should stay grey once we get our furnishings in)

I cannot tell you how great it felt to cover up the beige in the living room, office, master bedroom, and hallway. At first it's not offensive and it is just your typical builder beige, but after seeing it day after day you realize how yellow it turned the whole house. Mark and I both really love the grey we chose for the main areas. It is called "Dolphin Fin" by Behr and we used a flat finish.

We chose a flat finish for the living room, hallway, kitchen, office, and guest room. We started by using eggshell in the guest bathroom because the slight sheen of the eggshell finish makes it more durable and you want something durable in the bathroom. Something like semi-gloss or satin in there might perform better, but I don't prefer the reflective look and since our wall has a lot of texture, I want to bring as little attention to that as possible. 

After we saw how our walls looked with the eggshell finish, we decided to use flat for the rooms mentioned above. We went with eggshell for the Master bedroom, but I really like the flat finish so if we ever did it again (before any future potential kids) I would do the flat finish. 

Here are the colors for each room, if interested:
Living, hallway, kitchen: Dolphin Fin by Behr
Guest Room: Magic Mint by Behr (unable to find online)
Master Bedroom: Iron Mountain by Behr (unable to find online)
Trim: Perfect White by Martha Stewart Living in semi-gloss
I'll be sure to do a recap in the next few weeks of the price and gallon breakdown for each room.


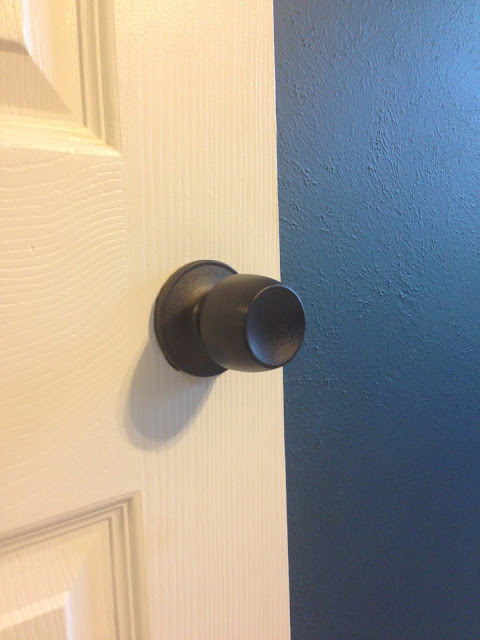
We also put all of the hardware back on the doors over the weekend. What do you think?

For those of you who follow on Instagram, here is the photo I posted of unmixed paint on Friday night:

...and here is the color that the paint turned out to be:
Yep, just navy! I can't recall what this color was called, but I'll look at our paint chips and update you when I find out. Crazy how much red was added to make this color, right?

Does the house look completely different? Do you like the changes, or would you keep some rooms the same? What is your favorite room?

Happy Monday!


Friday, August 2, 2013

Gotta get down with ORB on Friday, Friday!

Friday! 

That's right, y'all. It's FRIDAY! In my case, it's the Friday before we start transforming our house and I am beyond excited about that. I don't love painting by any means, but if it means we can get rid of 50% of the tan/beige in this house, I am all for it. We are inviting friends and family over to help us paint so if any of you have a free morning and want to get some complimentary breakfast, come on over and we will find something for you to do! :) What do you all have planned for the first weekend in August?

I mentioned that I was working on two different projects at the house this week. The first was cleaning the grout (and I've received some other tips and tricks since posting that, so I will have to try them and get back with you!) and the second was/is painting all of the door hardware. I saw this first on YHL (duh) and was surprised I had never thought to do this. You simply spray paint the door handles in whatever finish you would like to make a huge impact without the huge investment of new handles. For our house, I chose ORB, also known as oil-rubbed bronze. I like the dark finish and I feel like they will go with any decor that I have without being too harsh, like black might be. 

Here is the tutorial from Young House Love, in case you'd like to read it. 

So most of the handles in our house are a nice 70's gold with the exception of the guest room, guest bath, and master bath. For the guest room and guest bath, the door knobs had been replaced with brushed nickel fixtures, which are nice. So instead of painting those rooms, I just took the knob that faced the hallway and sprayed that, so all of the door knobs in the hallway will match but the brushed nickel finish will stay in those rooms without interfering or feeling weird to the rest of the house. Also, the bathrooms had more nickel components like the towel rod, faucet, and toilet paper holder, so it makes more sense to leave that as-is. 


Here is a wide shot of before in our master bedroom showing the linen closet and main door knobs.


The first thing I did was to go around and take off all of door knobs that I wanted to paint. (I'm holding off on the front, back, and garage doors for a nice day when I can leave the doors open and paint the door and the knobs at the same time, since it takes a while for them to dry)

Then, I took a medium grit sand block (this is a foam block with sandpaper on the edges. I got mine at Wal-Mart) and sanded down the knob. See the difference below.


 The sanding is meant to take the sheen off of the handles and rough them up so paint will adhere to them. 


YHL's instructions were to then use a liquid deglosser to further prepare the knobs for paint, but I couldn't find that at Wal-Mart and I tend to get impatient so I just skipped that step. Hopefully my painted door knobs will still hold up for a while, but if not, I know why!

After they were sanded and brushed off, I took them out into the garage and put them on a piece of cardboard, ready to be sprayed.


I used Rustoleum ORB spray paint, found at Wal-Mart and did a light misting to cover the knobs.


I continued this about 5 times, and then I flipped them over (after they were dry and onto clean cardboard) to get the underside.


I did this all in one evening, so they could air out and dry to be ready for the next day.


And here they are, back on the linen closet after 24 hours of curing.
What do you think? Worth it?


We also plan to sand down and repaint this cabinet, but I think this change makes a HUGE difference on the appearance of the house. The gold handles just age our house more than we'd like. I love the change already!


Like I said, we didn't have a lot of time to work on things over just two evenings this week, so I haven't finished all of the knobs yet. I have taken all interior knobs off and began spraying, but I haven't finished or installed any back to their doors. Here is the same before picture and steps for the door knobs, though.


P.S., all of that dirt on the door was just that, simply dirt! I went around and wiped all the doors down and they already look a million times better. This was just another thing we noticed after the house was empty. 


This shows a sanded knob on the left and an untouched knob on the right.


I'll be back next week with finished photos of the knobs and hopefully some progress photos of the painting! Now, who wants to start a poll of when we will start moving in? 

Have a great weekend!